Monday, December 13, 2021

iOS: Things I wish I knew before starting iOS development

If you just started learning how to build iOS apps, you might’ve felt overwhelmed by an endless list of things you should know. I’ve been there and I think I’m still there in a way.

Today, I’d like to share with you guys things I wish I had known before getting a foot into the door.

You don’t need to thoroughly understand every single detail about your code.

Because simply put, it’s next to impossible to understand all the moving parts in your code since they’re all tangled with one another, especially if you’re a newbie to Swift.

At the very beginning, it might be more helpful to just accept things as they are. Just follow the tutorial step to make the work done.

And then when you get more comfortable with how it works, you could get further into a low level of how this works.

Language first, framework later

People often first learn the tricks of a framework, and then move on to the language. That’s actually not the right way to go.

The simple reason here is that if you know about the underlying language, it helps you understand how the framework works. If you have no idea about the trades of a a language, there is no way you will understand why something is done a certain way in the framework.

Small Steps Can Make Big Changes

Don’t just read, implement. I’ve often seen developers read through tutorials or sometimes even whole books without anything much to show for it. However, my biggest concern is how much would you retain if you just read ?

Start with an app that you feel most comfortable. And add some function to it day by day. Even a tiny app also has its problem to solve. You wont believe what you would get after time.

Storyboard vs Code

If you’ve read enough articles about the iOS development, I bet you’ve stumbled upon an article about which way is better to create a user interface. In my opinion, you need to learn both of them.

Every company and every developer has their own taste in this matter but I do think you should go with the storyboard if you just start learning it.

It’s more intuitive and easier to see the visual change whenever you do something. And you might not even know what you can do with each UI component yet. Familiarize yourself with all the common components and auto layout enough before moving into creating all in code.

If you get that far with programmatic UI, figure out when one thing is more beneficial and how it’s better than the other. The time will come when you have to create a custom UI in code as if you’re heavily using the storyboard.

Learn about software design patterns

By the time you’re familiar with Swift, it will dawn on you that just making it work is not enough. You need to think about the maintenance aspect of an app, is it relatively easy to add a feature to the code base? is it easy to fix a bug when it’s found? is it easy to unit test?

When you’re working on a big code base and it’s not well-structured, you will find it extremely difficult to make a change or add another feature on top of that. It will get to a point where you made a change but not sure if it had any side effect on somewhere else in the code that leads to another bug.

That’s when design patterns come in the play. It’s all about how we structure code.

Try to learn different design patterns and apply them to your code base for practice. It will give you an insight into what should be considered to make the code base better.

Last but not least, expose yourself to anything related to iOS development

Mastering a technology on your own is great, but sometimes you learn a lot by just looking at the code of others. Be it your colleagues or random tutorials on the internet, try to find why someone approaches a problem in a certain way — and ask questions if necessary.

It’s also important for developers to realize that it’s impossible to know everything, but the knowledge is out there — you just need to Google it. As a beginner, if you’re stuck there is high probability that someone like you had the same problem in the past and the solution is somewhere out there in the internet (this often happens to the veterans too!)

Thank you for your time!

Saturday, December 11, 2021

Flutter: Top 10 Amazing Flutter chart libraries

Flutter, an open-source development kit created by Google has grown over the years.

Features Like Hot Reload, a vast widget catalog, very good performance, and a solid community contribute to meeting that objective and makes Flutter a pretty good framework.

Because sometimes in life charts and graphs are inevitable for us to display.

In order to make sense of numerics and data overall, in the same spirit, we need beautiful, responsive, customizable and easy to implement charts.

Flutter OpenSource chart libraries have the answers we need.

Here is a collection of 10 best chart libraries for Flutter to implement in your next Flutter project.

1. Fl_animated_linechart
Animated line chart library for a flutter, with tons of customization options, currently supports line and area


Features
  • Support for DateTime axis
  • Multiple y-axes, supporting different units
  • Highlight selection
  • Animation of the chart
  • Tested with more than 3000 points and still performing

2. Bezier Chart
A beautiful bezier line chart widget for flutter that is highly interactive and configurable.


Features
  • Multi bezier lines
  • Allow numbers and datetimes
  • Gestures support like touch, pinch/zoom, scrolling
  • Highly customizable

3. Flutter_candlesticks
An Elegant OHLC Candlestick and Trade Volume charts library for the Flutter.


Features
  • Easily create price watch apps using Flutter.
  • Suited for CryptoCurrency and share market apps
  • Fully customizable

4. Flutter Circular Chart
A library for creating animated circular chart widgets with Flutter, you can Create easily animated pie charts and radial charts by providing them with data objects they can plot into charts and animate between


Features
  • Beautifully animated circular charts
  • Fully customizable
  • Supports radial charts with multiple concentric circles

5. Flutter_charts
Flutter Charts is a charting library for Flutter, written in Flutter. Currently, the column chart and line chart are supported.


Features
  • Automatically checks for the X label overlap.
  • Plenty of examples available for easy start
  • The highly customizable flutter chart library

6. Flutter Plot
A pretty plotting package for Flutter apps. Sizing and auto adding aren’t great right now, but tinkering with padding and font size will allow for you to align things well.

Features
  • Fully customizable
  • examples available for an easy start
  • you can create super neat plots

7. Charts by Google
Charts is a general charting library Created by Google for the Flutter mobile UI framework.


Features
  • Wide Range of Charts Available
  • Includes charts like Line chart, combo chart, Axes chart e.t.c
  • A charting package for Flutter, supporting both Android and iOS.

8. Fcharts
With Fcharts you can Create beautiful, responsive, animated charts using a simple and intuitive API.


Features
  • A work-in-progress chart library for Flutter.
  • Responsive charts
  • simple and intuitive API

9. FL Chart
FlChart allows you to draw your charts in the Flutter, It’s a powerful Flutter chart library, currently supporting Line Chart, Bar Chart, and Pie Chart

Features
  • Handles Touches
  • Handles Animations
  • You can create awesome BarCharts
  • Also supports LineChart and PieChart

10. MPFlutterChart
A powerful Flutter chart view/graph view library, supporting line- bar- pie- radar- bubble- and candlestick charts as well as scaling, dragging and animations.


Features
  • Tons of charts available
  • supports dragging and animations
  • Highly customizable

Conclusion
That’s my collection of the best chart libraries for Flutter, if you have a great component and didn’t see it in here, leave a suggestion in the comments below. Have a wonderful charting and visualization experience!
#flutter #programming

Reference

Saturday, December 4, 2021

iOS: QoS - Quality of service

The Quality of Service (QoS) class classifies what you want dispatchQueue to do. Indicates the importance of your app by specifying the quality of the task. When scheduling tasks, the system prioritizes tasks with higher service classes. Higher priority tasks are faster than lower priority tasks and are performed using more resources, which typically requires more energy than lower priority tasks. You can ensure your app's responsiveness and energy efficiency by specifying exactly the right QoS class for what your app does.

priority

userInteractive > userInitiated > default > utility > background


userInteractive

actions that interact with the user, such as working on the main thread, refreshing the user interface, or performing animations. focus on responsiveness and performance.

The task is almost instantaneous.


userInitiated

this class assigns it to tasks that provide immediate results for what the user is doing or prevent the user from using the app. for example, you can load the contents of the email that you want to display to the mercenary. you need immediate results, such as opening documents saved as user-initiated tasks,or performing tasks when a user clicks something in the user interface. work is required to continue user interaction. focus on responsiveness and performance.

Tasks like seconds or less are almost instantaneous.


default

The default quality of service class. Assign this class to a task or queue that your app starts or uses to perform active tasks on behalf of the user. This QoS is not used by developers to classify tasks. QoS is used as the default for unspecified operations and runs at the GCD global queue level.


utility

a quality of service class for tasks that are not actively tracked by the user. tasks that take time to complete and do not require immediate results, such as downloading or importing data. utility operations typically have progress bars that are visible to the user. it focuses on providing a balance between responsiveness, performance and energy efficiency.

The operation takes a few seconds to a few minutes.


background

tasks that work in the background and are not visible to the user, such as indexing, synchronization, and backup. focus on energy efficiency.

Tasks that take a considerable amount of time and require minutes or hours


unspecified

There are no quality of service classes. This indicates that there is no QoS information and signals that QoS should be inferred into the system. If a thread uses a legacy API, the thread can have unspecified QoS.

Reference:

iOS: GCD - Grand Central Dispatch


GCD is an API that performs parallelism programming or multithreading operations. In other words, the GCD API handles which tasks to do, one sequentially, multiple simultaneously, sync or Async. You can choose the right queue and QoS for your situation to improve execution efficiency.

Dispatch Queue


GCD provides Thread Safe one Dispatch Queue to perform Multi-threading operations. All Dispatch Queues are FIFO data structures. Therefore, the task always starts in the order in which it was added.

Serial(main)


Serial queues are serial queues that process them one by one in the order in which they were added to the queue. One Task must be completed to process the next Task.


Because all events related to the UI are attached to Main Thread, all UI operations must be performed on the Main Queue.

Concurrent(global)


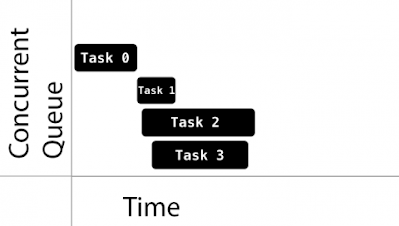
Component queues are parallel queues that execute multiple operations at the same time. Task runs in the order in which they were added to the queue. The number of tabs that can be run at once is variable and depends on system conditions. Global Queue provides quality of service (QOS)for prioritizing tasks.


When sending tasks to global concurrent queues, they do not specify a direct priority. Instead, specify a Quality of Service (QOS) class property: this indicates the importance of the task and helps the GCD determine the priorities to assign to the task.

Sync, Async


Sync (synchronous)

After the thread registered with the queue is finished, run the next queue sequentially.


Async (asynchronous)

The threads registered in the queue do not wait until the end of the operation, and the next queue is run sequentially and simultaneously. The end of a task is not sequential and can vary from task to task. The difference is whether to wait until one task is completed and then run the next. In the case of Sync, you should use Async because you can't do anything if you use it if it takes a long time or you're uncertain when it's going to be done. Depending on which queue uses synchronous asynchronous, you can use it as follows:
  • Serial
    • Sync
    • Async
  • Concurrent
    • Sync
    • Async


Using Dispatch Queue


Create DispatchQueue

// Serial Queue
DispatchQueue.main.sync { } // CRASH!
DispatchQueue.main.async { }
DispatchQueue(label: "com.CustomSerialQueue").sync { }
DispatchQueue(label: "com.CustomSerialQueue").async { }

// Concurrent Queue
DispatchQueue.global().sync { }
DispatchQueue.global().async { }
DispatchQueue(label: "com.CustomConcurrentQueue", attributes: .concurrent).sync { }
DispatchQueue(label: "com.CustomConcurrentQueue", attributes: .concurrent).async { }


DispatchQueue.main.sync If you use , you will get an error. The reason for this is that if you sync to the main queue while working on the main queue and block it, you will fall into a deadlock. If you synchronise serial queues, you can create and use custom queues rather than main.


Serial queue - Sync

Because other tasks are blocked until the end of the queue's work, one operation must be completed before the other runs sequentially.

let serialQueue = DispatchQueue(label: "serialQueue")

serialQueue.sync {
  for i in 0...3{
    print("\(i) [serial_sync_1]")
  }
  print("--------------------------")
}

serialQueue.sync {
  for i in 0...5{
      print("\(i) [serial_sync_1]")
  }
  print("--------------------------")
}

for i in 0...5{
  print(i)
}


======== Result ========

0 [serial_sync_1]
1 [serial_sync_1]
2 [serial_sync_1]
3 [serial_sync_1]
--------------------------
0 [serial_sync_2]
1 [serial_sync_2]
2 [serial_sync_2]
3 [serial_sync_2]
--------------------------
0
1
2
3  


Serial queue - Async

Because it is a serial queue, the operations entered the queue are processed in order, although other operations are still processed by running the queue asynchronously.

let serialQueue = DispatchQueue(label: "serialQueue")

serialQueue.async {
  for i in 0...3{
    print("\(i) [serial_async_1]")
  }
  print("--------------------------")
}


serialQueue.async {
  for i in 0...3{
    print("\(i) [serial_async_2]")
  }
  print("--------------------------")
}

for i in 0...5 {
  print(i)
}


======== Result ========

0
0 [serial_async_1]
1
1 [serial_async_1]
2
2 [serial_async_1]
3
3 [serial_async_1]
4
--------------------------
0 [serial_async_2]
5
1 [serial_async_2]
2 [serial_async_2]
3 [serial_async_2]
--------------------------


Concurrent queue - Sync

In the serial queue, one operation must be completed, such as sync, before the other runs sequentially.

DispatchQueue.global().sync {
  for i in 0...3{
    print("\(i) [global_sync_1]")
  }
  print("--------------------------")
}

DispatchQueue.global().sync {
  for i in 0...3{
    print("\(i) [global_sync_2]")
  }
  print("--------------------------")
}

for i in 0...3 {
  print(i)
}


======== Result ========

0 [global_sync_1]
1 [global_sync_1]
2 [global_sync_1]
3 [global_sync_1]
--------------------------
0 [global_sync_2]
1 [global_sync_2]
2 [global_sync_2]
3 [global_sync_2]
--------------------------
0
1
2
3

Concurrent queue - Async

Because we process tasks simultaneously in parallel, we don't know what will start and end first.

DispatchQueue.global().async {
  for i in 0...3{
    print("\(i) [global_async_1]")
  }
  print("--------------------------")
}

DispatchQueue.global().async {
  for i in 0...3 {
    print("\(i) [global_async_2]")
  }
  print("--------------------------")
}

for i in 0...3 {
  print(i)
}

======== Result ========

0
0 [global_async_2]
0 [global_async_1]
1
1 [global_async_2]
1 [global_async_1]
2
2 [global_async_1]
3
2 [global_async_2]
3 [global_async_1]
3 [global_async_2]
--------------------------
--------------------------
Reference: